Trusted by 237K+ Business Worldwide. Find a Location
Trusted by 237,000+businesses worldwide across 250 locations delivering uniforms, linens and more. Find a Location Near You

Delivering Excellence Since 1910
Contact Us
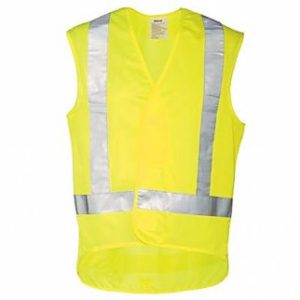
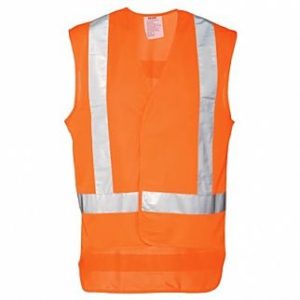
Why Is Hi Vis Clothing Orange?
When it comes to external work environments, orange is the most commonly used colour for hi-vis clothing (followed by yellow).
Why? There are two big reasons:
- Orange offers the best visibility against almost any background – especially natural greens or industrial greys and whites. While yellow is also very effective, it doesn’t work that well in the indoor environment and against white and grey walls.
- Orange is the closest to red and red means “stop”, “danger” and “caution” in context of safety and warnings. Humans inherently perceive red as a sign of danger.
The reasons for this are both cultural and possibly evolutionary. But why not red then? Red is also effective, but the prevalence of colour-blindness (particularly in males who make up the majority of most outside workforces) makes red impractical as it is indistinguishable from green to those people affected by this common condition.
These two reasons explain some of the reasons why hi vis standards in NZ require for all hi vis clothing to be orange and/or yellow. However, colour is not the only thing that makes hi vis clothing work. Let’s find out more.
How Do Hi Vis Vests and Jackets Work?
Hi vis vests and jackets utilise the fluorescent and reflective properties of different fabrics so that the wearer is more prominent against their surrounding while performing their job.
In other words, hi visibility clothing achieves its goal through conspicuity. In order to be conspicuous, every hi vis item needs to be easily detected and recognised.
To make the hi vis clothing easily detected, it is necessary to choose the right colours and to ensure contrast against the background.
Contrast is achieved by fluorescent and reflective fabrics on hi-visibility clothing. Therefore, there are two types of hi-vis clothing, based on the way in which they achieve increased visibility:
- Fluorescent hi-vis clothing is not fluorescent on its own, but it is dyed to achieve that effect. The hi visibility effect is achieved by the special dye “soaking in” the light of a certain wavelength and emitting it. Obviously, for this to happen, there has to be enough light, so this type of hi vis clothing will not do much good when the sun is down. Also, the UV lights do not have the appropriate wavelength, so the fluorescent hi vis clothing isn’t working well in those conditions, either.
- Reflective hi visibility clothing usually includes a hi vis vest or overalls that have reflective tapes on it. There is no hi vis clothing that is entirely made out of reflective fabric. This type of clothing reflects the light that is pointed directly to it. That is when it is the most useful and that is why the reflective tape is used on hi vis vests for traffic workers and those workers that work at night. The headlights of a car will throw the light ahead of the vehicle and if there is a person in front of the vehicle, the driver will see them due to the reflective hi vis tape for clothing.
Contrast is very important to achieve high visibility. Fluorescent and reflective materials will help to achieve it, but the choice of colours also plays an important role. To ensure better detection, it is necessary to use colours that are the most easily seen.
However, besides improved detection, colours are also essential to ensuring better recognition. Let’s explain how colours make us detect items more easily and recognise them in certain contexts.
Which Colour Is Most Easily Seen?
The answer to this question depends on the period within a day, but also on the context in which the colour is seen. For example, during daytime and from a distance, yellow-green is the most visible colour.
However, after dark, we are more likely to spot blue-green shades. On the other hand, you are more likely to spot red or orange against the green environment outside. How does this even happen?
This is all due to the fact that we perceive colour as waves. There are three types of the wavelength that colour travels in: short, medium and long. This classification is a bit loose, but it can explain the general principle behind using certain colours for hi vis clothing.
Another element that determines the visibility of a certain colour in a given moment is the amount of light. That is due to the biological features of our eyes that are designed to use light to perceive colour.
Namely, our eyes use the system of cones and rods to see. While cones are used to sense wavelengths, the rods are there to ensure vision when there is not much light in the surroundings. Both cones and rods are photoreceptors.
If a colour is most easily seen it ensures easy detection. That is the first factor, out of two, that needs to be fulfilled to ensure the effectiveness of hi vis clothing. The second one is recognition.
How Does Colour Contribute to Easy Recognition?
It is obvious that different colours have different meanings for us. Some people will say blue colour soothes them, while others will tell you that yellow stimulates them to work. This happens due to some evolutive principles, but also due to some cultural factors.
For example, humans will very likely spot red colour because that is the colour of edible berries that our ancestors used to eat. In time, the ability to spot red against green got imprinted into the collective memory of the human race. This is an example of how evolution dictates some of our responses to colours.
Is that it? We like red because it was once important to pick berries? It’s not as easy as that. In time, we, as humans, created different cultures that associate different meanings to different colours.
For example, red is the colour of love, energy, passion in Western cultures. In certain parts of Asia, it is considered to be the colour of good luck and fertility, while some African cultures consider it the colour of death. Therefore, culture and society often make us associate colours with different meanings.
That is why it is important to observe colours in different contexts. While on the road or in a warehouse with heavy machinery or even on a construction site, you will know that you should look out when you see red or orange. Also, when looking for a person who works on such a site, you will look for that bright-yellow vest.
In other words, we recognise orange and yellow in the context of such workplaces and situations as colours or warning. That is precisely how hi visibility clothing works in terms of colours. By adding some fluorescent dye to them, yellow and orange are made even more visible.
However, that is not enough when the sun comes down. That is why hi vis clothing also uses fluorescent colours, and/or hi vis tape for clothing to stand out even more. Fluorescent fabric is obvious, but the reflective tape is still a bit of a mystery. Let’s shed some light on it.
How Is Reflective Fabric Made?
The reflective tape can be micro-prismatic and glass bead reflective hi vis tape for clothing. We know that the fluorescent effect on the hi vi clothing is achieved by simple dying of the fabric. On the other hand, the hi vis tape for clothing works in an entirely different way. It is all about tiny prisms and beads. Here are the two most commonly used types of reflective tape:
- Micro-Prismatic Tape is plastic vinyl in its base. The plastic vinyl is formed into tiny micro-prisms. They are sealed in the tape. The prisms may be small, but they still reflect the light. Moreover, there is a lot of them and they reflect the light back to the source. The micro-prismatic tape is durable and long-lasting. It comes in different colours and shapes, but the downside is that it is quite expensive.
- Glass Bead Reflective Tape is what you see on most hi visibility clothing. Safety hi vis clothing usually has this type of silvery-grayish tape on it. This type of reflective tape is much cheaper than the micro-prismatic one and it still gets the job done. You just need to make sure you maintain it properly.
If you rent your hi visibility clothing from Alsco NZ, you won’t have to worry about the maintenance, at all. For all our customers, we collect the dirty garments on a regular basis and replace them with the clean ones. We take the garments to our facilities where it is being laundered with great care and using industrial level cleaning agents.
This regular laundering, pickup and delivery are all included in the monthly price of your hi vis clothing. Contact Alsco New Zealand today and learn what is the best offer for your flat monthly rate.
Photo courtesy of Creative Commons
ARHT on Saving Lives: Just in Time for Medical Emergencies
Morning time is when we’re summoning up all the strength we can muster so we can face whichever adversity the day throws at us.
Being accountable for a company’s future or performing any job role responsibly is not all plain sailing. But what if you were responsible for other people’s lives?
The crew of the Auckland Rescue Helicopter Trust lives with this responsibility 24/7, 365 days a year. And they’re doing a great job! ARHT rescue service is an Auckland based emergency aeromedical service.
With over 1000 missions a year, they’re keeping a watchful eye on Aucklanders needing urgent medical attention, a rescue mission or medical transport. And they’re always on the dot when there’s some lifesaving to be done.
The History of ARHT Rescue Services
It was back in 1970 when the Auckland Surf Life Saving Association started the ball rolling. They leased a Hiller 12E helicopter for surf rescues on Auckland’s west coast beaches. Making it the world’s first civilian rescue helicopter service.
These guys were good news to the community, even more so when they were brought on the air. Namely, the helicopter lifeguards started delivering surf reports straight from the chopper to the Radio Hauraki’s live broadcast.
The audience loved the glad tidings the flight crew brought them. So this resulted in successful fundraising which fixed the crew up with a new summer base and a landing pad.
Fast-forward to the present day, the service has thousands of rescue missions behind them.
The best way to taste a little bit of what ARHT does is via looking into the real-life stories of people they’ve helped.
Andy’s Long Ride Home
It was a July Friday afternoon when Andy Corles pulled out of the driveway to pick up his 4-year-old after her playdate. The family had just been packing for a holiday, but Andy never returned home that day.
It was raining heavily and Andy slid out of control while rounding a corner. The car hit a pothole, the bank and then flipped onto its roof.
The passersby dialled 111 and the local police and the ambulance crew showed up in no time. But Andy needed ARHT’s quick action. Otherwise, it would have been a three-hour drive by roadway to the nearest hospital.
ARHT flew him to the Auckland City Hospital in just 24 minutes. The Corles family believes Andy wouldn’t have made it without the rescue helicopter crew. The recovery was a long one, but Andy’s come out as tough as nails. His own words would suffice:
“A doctor asked me what I wanted to achieve at the spinal unit. I said I’m going home in a manual wheelchair. He told me it was great to have goals, but to be realistic. Well, I proved him wrong. It took a lot of work, but it was worth it in the end.”
Andy’s taken up hand cycling as he had promised. But not only that. He’s about to compete at Nicholas Browne Challenge and hopes to raise $4,500 for the ARHT while doing it.
14-Year-Old Finley Falls Down A Cliff Face
What appeared to be a cheerful walk with a mate on Grant Island, Mahurangi, turned out to be a disaster for a 14-year-old Finley Savage. A dreadful fall 15 metres down a cliff face left Finley with multiple head and arm injuries as well as a broken femur.
They had no phone on them so mate Robbie ran to fetch help. While he did so, these were exact Finley’s thoughts.
“I was falling in and out of consciousness when I heard the sound of those rotors. Best sound I’ve ever heard!”
Luckily, he’s fully recovered from the accident. Here’s what he says right off the top of his head to urge everyone to continue helping the chopper.
“After the accident, my mum said how lucky we were that the helicopter was there because we never thought we’d ever need them. If you can help them help others then please do so.”
If They Hadn’t Been Here, Finn Mightn’t Be Here Today
The two boys of the Macleans family share the common children’s restlessness. But sadly, what all four members of the family have in common is the same chronic condition – asthma.
The little three-year-old Finn has developed the condition at just six months of age. But what happened on 24th November 2015 was something they hadn’t seen coming. The boy got ill during the night and at one moment the parents noticed that the boy had gone a bit blue under his bottom lip.
The ambulance arrived within minutes. But it was the peak hour and they couldn’t have risked transporting Finn to the hospital by road. It took ARHT 13 minutes to get the toddler to the hospital.
After winning the battle with Finn’s severe asthma attack with the help of the helicopter, this is what the mum Jade’s reaction was.
“I think that getting Finn there quickly was the big difference between it going well and going south,” Jade says, trying to hold back tears. “It’s really sad to think had they not been here Finn might not be here today. We’re just really, really grateful.”
ARHT Has Alsco’s Wholehearted Support
The stories above testify to the ARHT’s immense value for the Auckland community. Alsco likes to be first in line when it comes to supporting such valuable community-driven organisations.
We’ve been providing financial contributions to ARHT for more than a decade. Moreover, everybody at Alsco can’t stop raving about this worthwhile cause.
Don’t Stay Behind – Give Your Support to Those Who Leave No One Behind
It’s vital to know anyone can help with the rescue mission. Being a part of it literally means helping more lives being saved. How can you contribute funds to the helicopter mission?
There are a few different ways. You can:
- Become a sponsor, choose your monthly donation and get a special mission certificate
- Become a fundraiser superstar, organise an event or a challenge to raise money on ARHT’s behalf
- Make a donation in memory of a loved one
- Contribute by purchasing ARHT’s high-quality products
- Help fund the purchase of two new rescue choppers
- Leave a charitable gift in your Will
Another thing you can do is jot down ARHT’s hotline number. It’s good to have it on you in case of an emergency. You could save it on your phone and share it with your friends and colleagues.
You never know whose luck this number can turn around when things go downhill.
FREEPHONE 0800 4 RESCUE (0800 4 737283)
What You Need to Know About Pop Up Restaurants
The term ‘Pop-Up Restaurant’ became a trendy term as far back as 2014. Historically, there were ‘supper clubs’ and ‘underground restaurants’ which were considered exclusive, until people realised that they can now be made accessible to the public for a limited amount of time, hence the birth of pop-up restaurants.
As of 2019, there has been steady growth in this trend. If a budding chef or foodie wants to test out their menu for a fraction of the cost of setting up a conventional restaurant, then this is the way to go.
The main reasons why pop-up restaurants are worth doing include:
- It’s not as costly as setting up a conventional restaurant
- It’s the best avenue for testing out new and exciting concepts that will get people talking
- It’s easy to latch on to existing brands and events where a ready audience awaits
- Similar pop-ups can be set up from town to town or state – like a tour waiting to happen
Here are a few pointers on how to set up a profitable pop-up restaurant.
Have a Business Plan Ready
A pop-up can serve as a major step towards owning a chain of renowned restaurants. As a budding chef, it’s important to have a business plan that outlines short and long term goals. This allows for adequate planning and in the long run, booming business. Check out some great sample business plans here.
Location, Location, Location
A pop-up restaurant can be set up in a back alley in any neighborhood that gets plenty of foot traffic, or even an abandoned building (provided it’s safe), or in a gallery or at a community event. It’s important to do your research on what will appeal to your demographic – are they mostly young, inner-city types or families with kids? Popular festivals and events are worth keeping an eye on – do they attract the type of people who would love your food? Whatever – if there are lots of people walking by at the right time of day for lunch or dinner – then a pop-up is a good bet.
Get the Necessary Licences and Permits
Maintain a good relationship and reputation with local council and authorities – follow the regulations when setting up a temporary installation such as a pop-up restaurant. For example, it’s important to find out if the location requires any rent or extra charges. There could be food handling certificates as well as liquor licenses (if this makes up part of the menu) and other permits that you need to obtain to ensure the pop-up gets the green light.
Focus on Marketing and PR for the Upcoming Pop-Up Restaurant
Sounds intimidating, doesn’t it? But there are promotional avenues that need little to no funds and still get people talking about your pop-up. To begin with, family and friends are a great start. Make use of their social media networks to help get the word out. Next, connect with popular local media sites, local TV and radio outlets, and magazine editors to increase your reach. These connections will prove invaluable long after the pop-up event, so nurture them.
Setting Up a Temporary Kitchen and Dining Area is a Must
The pop-up restaurant differs in a few ways from a food truck. To begin with, a food truck may or may not have kitchen and dining facilities for its patrons. A pop-up restaurant is a precursor to having a fully-fledged diner and so these facilities are important to have. Invest in easily-mobile and affordable options. The design of the temporary dining room also needs to be eye-catching but realistic. This is because repeat patrons may have high expectations which cannot be fulfilled in upcoming pop-ups – keep it simple for now. Explore cost-effective rental options from providers like Alsco to get good quality restaurant and hospitality supplies.
Have a Well-Laid Out Menu
The main reason people would flock to a new pop-up restaurant is a menu with a twist. This doesn’t mean complicated recipe combinations, but merely a menu that offers something no one else is doing. Make sure the menu is clear and well-laid out. For example, have a creatively written blackboard at the entrance of the pop-up so patrons can know what to expect. More importantly, keep the prices friendly and in line with the chosen location. Festival charges may not be as high as an independent set up because a pop-up can leverage the existing temporary infrastructure already in place.
Plan For Your Next Pop-up Restaurant
In other words, Rinse and Repeat. One pop-up restaurant down, lots more to go. This means finding out from those who visited the initial set up to share their experience and general feedback, from the venue to the menu.
Remember after-sales marketing and PR. This is the time to make use of the reviews to make the next one better. One sure way of keeping the pop-up consistent is having a long-term relationship with a regular festival or event in the area. This means the pop-up becomes constant during each subsequent event and costs are predictable.
The Do’s and Don’ts When Setting up a Pop-Up Restaurant
- Do: Plan Ahead – Adequate planning, from funds to affordable suppliers, is crucial to make the pop-up restaurant a success.
- Do: Be Social – As an upcoming restaurant owner, it’s as important to develop a rapport with the locals as it is to wow outsiders. Look after the locals. Know who’s who in the zoo.
- Do: Be Open-minded – As an emerging chef or restaurant owner, you must be open to criticism. Flexibility helps you adjust a business plan, tweak the menu and stay focused on keeping your customers happy. Don’t live life in an echo-chamber with people who just tell you everything is perfect – ask for criticism, never get complacent and always strive to be better than the last time. Your customers will notice.
- Don’t: Spend More than Necessary – It’s important for a pop-up restaurant venture to be as cost-efficient (if not profitable) as possible. Make connections with affordable suppliers, take advantage of already existing events to keep overhead costs down, and remember that a fully-fledged restaurant is the end goal of the venture (money must be saved!).
- Don’t: Cut Corners – Do NOT set up a pop-up restaurant without the necessary permits and licenses. This could adversely affect future pop-up ventures applications and, ultimately, the restaurant or bistro you are working towards creating. Use affordable but quality equipment in order to avoid overspending on replacements or having malfunctions during the event.
Photo courtesy of Flickr by SteelMaster Buildings
7 Ways to Promote Your Business Online For Free
Imagine a time, in the not so distant past, where the ways to promote a business included printed fliers, advertisements in magazines and broadcast media or word of mouth.
It was a difficult and expensive way to tell the world about your business. Now, spreading the word has gone into overdrive thanks to the internet.
It’s now possible to pass a simple message about a business online to multiple people quickly and easy. In the long run, a business will have to spend on marketing campaigns to get the word out, but startups can take advantage of free avenues to promote business online.
Get Listed on Google My Business Listing and other Directories
It is now possible to post information about a business on local listing platforms, with the most popular being Google My Business Listing. There are many listing sites that have become popular with the growth of the online community. Facebook and Apple Maps are some of the biggest listing sites out there.
Other Listing platforms include Foursquare, Bing, Yelp and Hubspot among others. It is important for your listing to have the proper business name, correct location (a Map is a great bonus), company description, website link and any multimedia that can give searchers a deeper insight into the business. Keeping company information up to date for visitors is what keeps clientele coming back and referring the business to others.
Get an SEO-Friendly Website Up and Running
Nowadays, a business sans website is considered ‘fishy’. Therefore, it is important to have a detailed and eye-catching website that gives visitors and clients a clear picture of the business. To get more people viewing the site, make it SEO-friendly to allow it to appear among top searches for businesses of the same niche. When creating a website, ensure it is accessible on multiple platforms (mobile, desktop and tablet). It should also have a seamless user experience to avoid potential clients from skipping your website. Finally, avoid having duplicate and obsolete content on the website. This means there is a constant need to update the site to keep it appealing and have more traffic over time.
Make Social Media Your Friend
Social media has become any business’s best friend. This is because these platforms are a ready client base, if used adequately. To begin with, create social media pages for your business on sites like Facebook, Twitter, Instagram, LinkedIn and Pinterest. Make sure that the pages are regularly updated to keep visitors abreast on progress and changes. Social media is affordable and sometimes free which means costs when starting up a business down to a bare minimum.
Make Use of Multimedia Sites to Take Your Advertising To the Next Level
They say a picture is worth a 1,000 words – imagine how much multimedia speaks for a business! Aside from social media pages for the business, have a YouTube channel with relevant information about the business. One can start with an intro video to the business that shows the setup, the team and overall goals of the business. An additional tool to have is a Flickr account that allows a business to have pictures related to the business all in one place.
Submit Listing to Search Engines
Submitting a business listing to online search engines is free and takes only a few minutes. Simply use the webmaster tools for popular search engines such as Google, Yahoo! and Bing. You don’t have to pay to get into any of the major search engines’ free/organic listings. Google, for example, indexes your web pages automatically, as do most other search engines.
Take Advantage of Free Email Marketing
Another way to promote business online is by making use of free email marketing platforms like Mailchimp. These allow a business to send out thousands of emails monthly to thousands of potential customers – so the potential for getting your message out there is limited only by your skills at writing good copy.
It’s important to note that the set up of an email marketing account takes time to create. There’s a client list to compile and branding to apply, so patience is key. Also ensure there are clear calls to action (CTAs) and contact options, otherwise you will lose customer acquisition opportunities.
Connect with Online Business Community Forums
Every startup business that wishes to be successful needs to connect with other like-minded entities. Online business community forums are the best place to start. These forums have discussion boards broken down into every relevant topic, giving your business a chance to advertise a product or service and offer advice to its members.
Well-known platforms such as Yahoo!’s OnStartups, YoungEntrepreneur and EConnect by Entrepreneur have hundreds of thousands of business people willing to share useful tips and advice. Consider also looking for local forums that offer discussions relevant to your business and locality.
Aside from advertising or finding business advice, a startup can use event sites such as 10Times or EventBrite to share information on events such as launch dates, conferences, forums, online events, and more. These sites segment their audiences and are a great way to showcase your business profile quickly and easily.
Promote Business Online Etiquette
- Keep your business information up-to-date – This means letting people know of a change of address or business category or even merging with another business. Keep your clientele up to speed on your business moves.
- Avoid over-promotion – When sending out emails or posts, ensure that they are regular but not too frequent. Too many posts or emails from the same business can put off a customer or visitor and give them an excuse to unsubscribe.
- Avoid using negative language against a competitor – There is a piece of the business pie out here for everyone, so focus on building your own business and avoid tarnishing a competitor’s business. It paints your business in a bad light.
- Respond and Deliver – When queries or complaints are forwarded to a business, quick turnaround time is vital. In addition, delivering a quality product or service in the record but realistic time is worth the effort in terms of customer satisfaction and advocacy – after all, referrals are the best and cheapest source of new business leads.
Photo courtesy of Freepik by @freepic.diller
How To Make Your Business Travel Work For Your Personal Life
Business travel is interesting because you get to take an all-expenses-paid trip courtesy of your profession.
In a job that requires constant travel, it can become daunting because while travelling, you can’t fully enjoy the trip as you have obligations to fulfil.
According to research on business travel in Australia, 2.2 million Australians travelled for business in 2017, which was about 10% of the population.
At least half of these travellers probably took some time out to enjoy a personal vacation.
When travelling for business, it’s important to be smart and get a little vacation out of it. You can even plan your business trip around a family vacation, which is a definite plus. There are some neat tricks that you can take advantage of to make your business travel work for your personal life.
Take Advantage of Free Hotel Nights
When going on a business trip, where you lay your head at the end of the day needs to be comfortable and make the trip more tolerable. This is where you will look at fun spots either in or around the hotel. Thanks to companies like AirBnB, you can choose a cosy spot that makes it feel like a home away from home.
Many booking sites and hotels will have discounts and offers for regular customers. For example, some hotels will use a point system to reward you with a free night or more. In addition, you can choose a hotel package that offers discounted rates on rooms or will give you free nights.
Plan Your Business Travel Itinerary Around Family
The art of taking a personal vacation during business travel now has a name – Bleisure. When going on business trips, some of them can fall at the end of the week, like on Thursdays or Fridays. Because the company is still going to pay a return flight back home for me, make good use of it and take the weekend to relax.
We tend to miss family when taking business trips. So take a look at the work plan and identify a long weekend during the trip. You can have your family come to the town you are working in to spend time with you. You can book the return ticket on Sunday evening, then you and the family will all be back home in time to plan for a new week.
Use Your Account to Accumulate Frequent Flyer Points
If you are in the business of regular flight travel, then it’s a good move to use your own account to accumulate flying points. The main benefit of these points is that you can get free tickets once you reach your target.
Encourage the company you work for to allow you to make your own flight bookings. You can then use your account after some time to buy a ticket for a loved one or for a friend to squeeze in a vacation between business. We all want to live a good life and we can then use these points to upgrade to business class tickets. Even if you will be putting in hours, you might as well be relaxed while at it.
Budget Your Business Trip To Get Extra Vacation Funds
There are business trips that your company will want to get business class flights or five-star hotel rooms. This is another time that you can request to make your own bookings. Go for budget hotels and flights to save some cash.
Make use of the extra funds to travel to historical places in towns you visit as well as get some extra nights at a hotel for much-needed rest and relaxation. You don’t have to use the money at that time but you can save up and then go on a family vacation or on a solo retreat to rejuvenate.
Don’t Be Afraid to Combine Business and Pleasure
Business travel is sometimes the only way we will visit dream destinations for free. When you get the chance to travel to a holiday destination or a place you’ve always wanted to visit, grab the chance to go sightseeing. You may not be able to visit all the hot spots in the area, but you can try as much as you can to get some tourist time out.
If you have a tight schedule, take advantage of the sports bar or restaurant overlooking the ocean to unwind after a long day. You can enjoy a great meal, a fancy cocktail and some good music, without straining yourself. This is also a good time to make new friends and network with other business people.
Whenever you travel to a place where you have relatives and friends, you can give them a heads up that you’ll be in their neighbourhood. You can either meet at the hotel you are staying at or visit them where they are. This means you can get some work done and still connect with friends or family.
How Can You Enjoy Your Personal Vacation During Business Travel?
- Plan your leave days to get in some vacation time while travelling on business. Companies usually have a long term plan for their businesses, which means any work travel is known ahead of time. Try and take some personal days around your business trips and have a good time after working.
- Pack light when travelling for business. When taking a business trip, think about packing light so you’re able to move around for your personal vacation time. Packing light also gives you some space to buy some souvenirs to bring back home.
- Make the most of your business trip. Companies might have restrictive travel budgets and this means less time to relax while on business. This shouldn’t worry you, visit a well-known bar or beach not too far from your work location.
- Plan ahead and be flexible when on a business trip. Find out about travel and accommodation arrangements in advance. For example, you can get a bigger room or rent an apartment if you have a family or a loved one tagging along. You should also find out if all the bookings made can be adjusted or cancelled. This will allow you to get the most out of your bleisure trip and also keep you from paying penalties or cancellation charges and affect your budget.
What Are the 3 C’s When Dealing with an Emergency?
The three C’s represent the mnemonic technique that should help people who administer first aid. They are meant to help these first aiders remember the course of action and their sequence so they can provide the best possible first aid. The first C’s are:
- Check
- Call
- Care
Check: For the first aid to be administered successfully, the patient, first aider and the present people should be out of the influence of the hazard that has caused the injuries.
Moreover, you should check for the safety of you, patient and the others. This can include removing the victim from the traffic or putting out the fire, providing the airflow and eliminating toxic fumes, etc.
Call: One of the primary functions of the first aid is to actually give the victim enough time and prolonging their life until the ambulance arrives. For that to happen, the ambulance needs to be called. As soon as you assess the surrounding, you need to call the 111 and talk to the operator explaining the specifics of the situation and answering their questions accurately and directly.
Care: The first two C’s are actually the preparation for the main course of action – providing medical assistance. This is where you actually start administering care to the patient. In some cases, it will simply mean dressing a wound, but it can also mean monitoring a person’s breathing and pulse, giving them CPR and even shocking them with AED.
For the most steps of the third C: Care, you will need special supplies. The first aid supplies are packed in the first aid kits. Every workplace should have at least one. Rent your workplace kits from Alsco NZ and make the Care step much easier for your first aiders.
For instance, did you know that floor-to-ceiling cubicle doors can seriously compromise safety and make the checking and caring for the injured person impossible?
You should be aware of hazards such as this especially if you work in a school or other crowded environment.
Learn how to make your school washroom safe and healthy with our ultimate guide.
What Are the Steps in Assessing an Emergency Situation?
Once you find yourself in an emergency situation, you need to assess it quickly, especially if you notice that there are one or more people injured. Don’t rely on the other people to be responding, because this does not always happen. Look around and do the following three steps of assessing the situation:
- Assess the situation
- Assess the environment
- Assess the patient
Assessing the situation – this means establishing what is going on, if there are injured people and what are other people doing. You will notice that many people react to emergencies by freezing. In many cases, the bystanders will do nothing to help the person in trouble. That is why you should react instantly if you see that somebody is hurt. If you need help from the others, give them precise directions about what to do and they will most likely follow them.
Assessing the environment – this is the moment when you need to see what caused the injury to the patient and if they are still in the same danger. Moreover, you need to take care of yourself and the others, also. You, as the first aid provider are useful to the patient only if not injured yourself, so do everything in your power to stay safe.
Assess the patient – check the patient’s pulse, breathing and airways. Those are the three things that you need to do if the person is unconscious. If you are not sure if the person is conscious, shake them and call them like you would if you were waking them up from a deep sleep. If they are not responsive, go for the pulse and breathing.
- Check for the breathing by laying the person on the back and observing if their chest is moving. Place your hand on their chest to closely feel the possible motion. Move your cheek next to their nose and mouth and try to feel their breath.
- Check the airways by raising the patient’s jaw and tilting their head back so you can see the inside of their mouth. If you see something, turn the patient to their side and unblock the airways.
- Checking the pulse is best done by placing the index and middle finger on the carotid artery which is next to the windpipe.
What Is the First Thing You Should Do If a Person Is Unconscious and Not Breathing?
When you see a person without consciousness and not breathing, you still need to check their breathing and try to wake them up. This should not last long. Establish the lack of consciousness and breathing by taking the following steps:
- Call or ask somebody to call 111
- Check the airways and unblock them if necessary
- Start CPR
While administering the CPR, ask somebody to give you AED and use it on the person. Don’t worry, the AED will not administer the shock if there is no heart rate or the heart rate is regular.
What Do You Do If Someone Has a Pulse but Is Not Breathing?
If the person has a pulse, but they are not breathing, it is possible that their airways are blocked and need to be unblocked. If that is not the case, start the “rescue breathing” until the ambulance arrives.
Positioned them on their back and start with the “rescue breathing”. This is different to the CPR because, during the CPR, you are pressing the patient’s chest, while when performing the “rescue breathing” you are only blowing the air into the patient’s mouth, but without the compressions.
You should tilt the patient’s head, pinch their nose, and open their mouth. By positioning your mouth on theirs, slowly breathe in the air. This should be done once every 5 or 6 seconds.
How Do You Give a Defibrillator Shock?
While you are going for the first aid kit, or calling the 111, grab the nearest AED in your workplace and have it handy. AED in combination with the CPR gives the best chances for survival to the person who is unconscious and has an irregular heartbeat. Defibrillator shock is given in a couple of steps:
- Position the person on their back
- Open their shirt
- Wipe them dry if necessary
- Place the AED pads, one above the right nipple and other slightly to the left side of the chest.
- Make sure nobody is touching the victim
- Press the start button
- Continue CPR when the AED informs you it is safe to do so
Both AED and the first aid kit are the first aid equipment that can mean the difference between life and death in the emergency situation.
Alsco NZ can rent you the first aid kits and the AEDs for a flat annual price. For the same price, we will regularly make sure that they are working properly. We will fill the cabinets when the supplies are used and we will make sure they are all up to date.
Get your first aid kits and AEDs from Alsco NZ today.
Photo courtesy of Max Pixel
What Is Automatic External Defibrillator (AED)?
AED stands for Automatic External Defibrillator. This is a small and light electronic device that is used to diagnose and treat certain life-threatening heart conditions in the case of an emergency.
It is done by the method of defibrillation. Automatic External Defibrillator is portable and runs on batteries.
An Automatic External Defibrillator should be in all workplaces in New Zealand since it is of essential importance in the case of emergencies.
Heart disease and different heart conditions can lead to an irregular heart rate, called dysrhythmia which can be life-threatening.
The causes of such conditions can be varied but include previously suffered heart attacks, certain substances or congenital heart conditions – heart conditions that you have been born with.
What Is an Automatic External Defibrillator Used For?
An Automatic External Defibrillator is used for the first aid response in case of a sudden cardiac arrest (SCA). More precisely, when a person is suffering from an abnormal heart rate which usually happens as a cause of a cardiac arrest. The two most common reasons for the AED are Ventricular Tachycardia (V-Tach) and Ventricular Fibrillation (VF).

An AED is used to administer an electric shock that should trigger normal heart function. When a sudden cardiac arrest happens, the heart loses its rhythm, which is essential for sustaining a human life. Usually, the lower parts of the heart start with the rapid and erratic beating that doesn’t pump enough blood and doesn’t do it properly.
That is the ventricular fibrillation. When it occurs, it means that the heart is not performing its function properly, and the person suffering from VF will probably experience a rapid and severe drop in blood pressure and lose consciousness. If not treated with an AED and CPR instantly, this can be fatal.
How Does an AED Work?
An AED releases electrical current into the heard of those suffering from the VF or some other abnormal, life-threatening heart rhythm. The idea is to stop the heart for a split second and reset it. In that way, the heart should automatically resume its natural rhythm.
The AED will not release the electric current unless required. It has an analyser in it that checks how the heart is beating and it releases the current only when it picks up the signs of abnormal heart rate. If it ‘sees’ that there are signs of VF or V-Tach, it will release the current of 150 to 360 Joules. That’s enough to restart the heart without causing permanent or irreparable damage.
That is why it is important that the AED is used properly.
The electrodes of the AED should be placed on the patient’s chest. Through them, the heart rate is measured and analysed by the AED. If they show that the person is suffering from VF or another life-threatening arrhythmia, the electrical shock is administered through the pads.
Does an AED Work on a Beating Heart?
Yes. An AED works on a beating heart. Moreover, it only works on a beating heart. An AED will not try and shock the heart that is not beating. Once you place the electrodes on a patient’s chest, the analyser looks for the signs of the beating heart and establishes whether the current needs to be administered or not.
The reason for administering the current are the signs of erratic and irregular heart rate. Therefore, if the heart is not beating, the AED will not detect the VF or V-Tech and won’t administer the shock.
What Are the Steps for Using AED?
There are several steps for using AED that you should be aware of before the situation occurs. Also, keep in mind that a lot of instructions are already on the AED display as you perform the first aid.
Turn on the AED.
Some AEDs are battery operated, so you won’t need to plug them in. Check your AED right now and learn if it is battery operated or needs a socket. This will save you time one day when you need it instantly.
Remove the patient’s shirt.
The chest of your patient needs to be bare, dry and with no patches on them. There should be nothing that could get in the way of direct contact of your AED and your patient’s skin.
Position the pads.
Sometimes the pads are already connected to the AED. Sometimes, these pads need to be plugged into the AED. Make sure they are plugged in before proceeding.
Warn everybody to stand clear from the patient.
Nobody should be in direct contact with the patient. The electric shock may transfer to them, as well and that is very dangerous. This includes the person who is using the AED. Make sure that you are not touching the person accidentally with your legs, body or in some other way – not just with your hands.
Press the analyse button.
Watch the instructions from the AED. It will analyse the heart rate and administer the shock if necessary.
Perform CPR.
AED will check if the electric shock needs to be repeated. In the meanwhile, perform the CPR and make sure you analyse the patient using AED again
It is important that you use your AED during the first 3-5 minutes after the cardiac arrest has happened and the person has lost consciousness. The quick and swift reaction is essential and it is the only way to save somebody’s life.
Therefore, what you can do right now is check if your workplace has an AED, where they are and how they work. That will save you precious minutes if the situation arises. Inspire others to do so as well, since they will be the ones to use the AED on you if you are unfortunate enough for an SCA to happen to you.
Work in a school? Create a safe school environment for all the children you’re responsible for at your workplace.
Apart from an AED to save lives, you must meet the basic school washroom legal requirements and provide all the students and stuff with a safe and healthy environment.
Fresh & Clean School Washroom Guide teaches you all you need to know about it.
Your workplace doesn’t have an AED? Contact Alsco New Zealand immediately and get your AED.
You don’t have to invest thousands into an AED. You can rent it for a flat affordable annual fee and get it checked regularly without additional cost.
What Is In An Earthquake Kit?
There are two items that should be clearly discerned when it comes to workplace earthquake preparedness: the grab bag and the earthquake kit.
The workplace earthquake kit checklist should include:
- First aid kit and life-sustaining medicine (e.g. insulin)
- Battery powered or self-charging torch
- Radio
- Spare batteries
- Dust masks and protective items
- Toilet paper, moist towels and rubbish bags
- Food and water supplies
It is easy to conclude that the workplace emergency kit should equip you with all the necessary tools to sanitise any wounds, keep you fed and hydrated for a while, allow you to contact your family and the rescue teams and ensure basic sanitary needs.
What Do You Put in a Grab and Go Bag?
We already mentioned that the earthquake kit and a Grab and Go bag are not the same. The workplace earthquake kit is a necessary item that every New Zealand workplace should have. It should be used after the earthquake to make sure the consequences are dealt with.
The Grab and Go Bag is also recommended for most workplaces and these are individual bags that each of the employees should assemble for themselves and keep close in case they need to evacuate immediately.
Here is what you should find in an average Grab and Go bag.
- Water, energy bars and dry food
- Essential toiletries
- First aid kit and necessary medicine if needed
- Covers or blankets
- Foldable raincoats, fleece clothes and walking shoes
- Torch and radio
These bags need to be designed in a way that allows them to be carried easily. You can make a shoulder bag, but many people opt for a backpack since it is easier to carry and leaves both of your hands free.
Where Is the Safest Place to Be During an Earthquake?
The answer to this question greatly depends on where you are at the moment of an earthquake. Therefore, here is a table that can help you make your choice:
What Is the Safest Place to Be during an Earthquake? | |
Where are you during earthquake? | Where to go? |
| Inside your home/workplace | Stay inside |
| Outside | Keep away from the buildings, street lights, electric posts. Seek open areas. |
| In a moving car | Slow down, pull over and stay in the car |
| In a moving train | Stay inside the train and keep calm |
| In an elevator | Wait until the shaking stops before exiting the elevator |
| On a beach | Wait until the shaking stops and seek elevated ground due to tsunami possibility |
Regardless of where you are, you should follow the instructions given by Get Thru New Zealand.
The most important thing you should instruct your employees to do is to Drop, Cover and Hold.
This means that all your employees should drop down so that they are not knocked down by the earthquake. In that way, they will avoid injuries from the fall.
Together with your employees, you should identify the sturdiest pieces of furniture, usually the desks, that can be used as a cover from the masonry that can fall down from the ceiling and walls.
Holding onto the shelter is also important because it will prevent people from sliding away from the shelter or, on the contrary, preventing the shelter from sliding away itself.
Holding on also provides people with a feeling of security, much needed in a case of such emergency.
Also, it is important to keep in mind that there can be persons in your workplace that cannot drop down that easily, even in the case of emergency. That is why it is important that your employees know their options in case of an earthquake:
IMO @NZGetThru should do more to inform pple who are not able to just ‘drop’, ‘cover’ & ‘hold’. Like this pic on FB: pic.twitter.com/8UtiyiibaN
— C_NZ_ (@C_NZ_) October 14, 2015
This, together with the location of the workplace earthquake kits, is the essential piece of information in case the grounds start shaking – a fairly common occurrence in New Zealand.
How Much Does an Earthquake Survival Kit Cost?
The New Zealand price of earthquake survival kit for one person can be up to $260. This usually contains items that people would have in their homes, but rarely carry to their workplaces.
Do you need to create, from scratch, these kits for each of your employees? Luckily for you, no. There are special workplace earthquake kits that you should use.
Their price greatly depends on the size of your workplace and the number of people that are present in your workplace on a daily basis.
The earthquake kits for 50 people should be a bit different than those for 5 people. That is something to consider once you plan your workplace emergency procedure and the equipment of your office.
Putting together your own earthquake survival kits can be challenging.
You need to make sure you buy all the necessary items, pack them in the appropriate way, so that they are usable in a case of emergency and to regularly check them and replace items if they have expiry dates.
Therefore, managing your own earthquake kits can cost you time and money. The good news about the cost of your earthquake survival kit doesn’t have to be paid in full, all at once.
Moreover, you don’t have to worry about replenishing the items in a timely manner. There is a much better option than buying the earthquake kits. You can rent them.
Renting earthquake kits means that you just need to contact Alsco New Zealand. We already have emergency kits in our offer that are available to you for a flat, annual fee.
Call us and we will discuss the size and the needs of your workplace. We will recommend the number of our emergency kits and we will deliver it to your doorstep.
This is not all. Since even the first aid kits have perishable items, we will regularly come back and replenish the earthquake kits and replace the items close to their expiry date. That is all included in your annual fee.
Call Alsco New Zealand now and get your best quote for a earthquake kit rental.
How Do You Maintain a First Aid Kit?
Once you purchase a first aid kit, you just find a place for it and don’t give it a second thought. You hope for the best and hope that you will never need it.
But, there is an expiry date on many first aid supplies. If the first aid kit is not maintained, it can be useless in the case of an emergency.
Here are the things you should do to keep your first aid kit maintained:
- Choose two dates a year when you check your first aid kits.
- Replace all the supplies that are close to the expiry date.
- Check that the first aid kit easily opens
- Check that the first aid kit is not damaged
- Check that all the contents and supplies are in stock.
- Check that the sterile products are still uncompromised and sealed.
Only by regularly checking your first aid kits can you be certain that they are always ready to use. It is just a matter of habit. Also, your employees all need to know where the first aid kit is and what it contains.
Not all of them need to know how to administer the first aid, but it is advisable that you have at least one of them who is a certified first aider.
First Aid kits help save lives. They are the first step toward getting real medical assistance in case of emergency. Therefore, their maintenance cannot be emphasised enough. However, it is easy to forget about it and business owners usually don’t have the time to deal with it.
Alsco NZ has the answer. Our rental program helps you in two ways: first, you don’t have to pay a lot of money upfront to buy first aids and secondly, once you rent first aid kits from Alsco NZ, regular maintenance by our professionals is included in your annual rate. Get maintained first aid kits for your workplace.
What Should You Keep in a First Aid Kit?
To maintain a first aid kit, you first need to have one. New Zealand workplaces are not legally required to have precise contents of their first aid kits. However, there are recommendations made by the Ministry of Business, Innovation and Employment of New Zealand (MBIE) about what should be found in a basic first aid kit:
- First aid instructions
- Phone numbers of first aiders
- Saline solution and wet wipes
- Adhesive dressings
- Bandages and eye pads
- Wound dressings
- Resuscitation mask
- Clasps or safety pins
- Gloves, scissors, tweezers
These are just general items that can be found in a basic first aid kit that is appropriate for an average workplace with no special risks. This is a first aid kit that will work well in a school office, retail shops even a restaurant.
Better prevent than cure, right?
In addition to keeping your first aid kits properly stocked and regularly maintained, especially if you work in a school, learn how to create a safe and healthy environment to minimise the risk of accidents.
This School Washroom Guide can be your starting point.
However, the first aid kit contents can and should be adjusted to specific workplace requirements. Here are some more details about the contents of the first aid kit.
- Instructions – Not everybody works well under the pressure of an emergency situation. Even if they know a thing or two about first aid, the adrenaline can render them flustered and unable to remember what to do. That is why you need first aid instructions, written in brief and concise directions.
- First aider phone numbers – The phone numbers of first aiders can be useful to get in touch with them for advice or to call them if they are within the facilities.
- Saline solution and wet wipes – Wet, sterile and packed one by one. That is how you want your wipes to be. They are needed for wiping your hands and similar activities in case that there is no running water nearby. The saline solution has a similar purpose, but it is usually used to disinfect the wound so it can be properly dressed.
- Adhesive dressings – these supplies make sure that your dressing of the wound stays in place. They are excellent for cuts and slits. You need them in different shapes and sizes and the minimum is 20 pieces of individually packed dressings.
- Bandages and eye pads – two stretch bandages come in handy in cases of bleeding that needs to be contained and compressed. Regular ones have their use, as well. It is best to have two of each kind. Also, eye pads are specially formed types of bandages that serve to protect the hurt eye from possible infections. All these supplies need to be sterile.
- Wound dressings – you use bandages to keep the wound dressings in place. That is why they need to be sterile and unmedicated. They are what comes in contact with the wound, so if they are not sterile, there is a good chance that the wound will be infected. You cannot predict the wounds, so you need to be prepared. The most commonly picked sizes are 12 cm x 12 cm and 18 cm x 18 cm. Keep the stock of 6 smaller dressings and 2 big ones.
- Clasps and safety pins – the wound dressings provide protection for the wound and the bandages keep them fixed, but what makes the bandage stick? That is where the clasps and the safety pins come. They are needed to attach the bandages and other first aid supplies.
- Resuscitation mask – it is not always sanitary and/or safe to give mouth-to-mouth to an unconscious person. That is why you should use a resuscitation mask. It contains filters that prevent viruses and bacteria to get transferred from one person to another during CPR.
- Different small tools – the use of scissors is obvious. You need to open the packages and tailor the bandages in some situations. Tweezers are irreplaceable when you need to remove foreign objects from eyes or ears.
It is challenging to worry about every little thing in your first aid kit. But, Alsco NZ doesn’t mind. We will put this and anything else you may need into your workplace first aid kits.
Moreover, we will visit you regularly to check if anything needs replacing or restocking. It is all the safety and none the worry with Alsco New Zealand. Get your customised first aid kits to keep your employees safe.
What Items Are Found in the First Aid Kit?
Different workplaces will have different requirements for their first aid kits.
If you are working in an office with low levels of risks for a workplace injury, a simple, basic first aid kit will be enough.
However, if you are working in the mining industry, you will need a much better stocked first aid kits.
While restaurant businesses will have more need for bandages and adhesive dressings, you can expect for the miners to have more need for resuscitation masks and more sterilisation supplies.
Either way, every first aid kit should contain at least the following:
[b3_row]
[b3_column lg=”6″ md=”12″ sm=”12″ xs=”12″ ]
- Phone numbers and contact information of first aiders
- Wipes
- Adhesive dressings
- Eye pads
- Bandages (regular and stretch)
- Saline solution
- Clasps
[/b3_column]
[b3_column lg=”6″ md=”12″ sm=”12″ xs=”12″ ]
- Safety pins
- Scissors
- Tweezers
- Gloves
- Resuscitation mask
- First Aid Guide
[/b3_column]
[/b3_row]
You need to assess your workplace first. Alsco NZ already has decades in supplying workplaces with first aid kits and similar items. Contact Alsco today and let us help you rent appropriate first aid kits.
What Supplies Should Be in the First Aid Kit?
Let’s get back to the basic first aid supplies and try to go into a bit more detail about them. This will help you determine which of these supplies you really need and which can be reduced to a minimum to make room for the more useful items.
First aid guide and contact information – this should definitely stay in your first aid kit. Your workplace needs first aiders and people are sometimes flustered in the emergencies, so they cannot remember details like phone numbers or even whom they should call. The first aid guide should be there to help people start administering the first aid as soon as possible.
[b3_row]
[b3_column lg=”4″ md=”12″ sm=”12″ xs=”12″ ]

MINOR BURNS
[/b3_column]
[b3_column lg=”4″ md=”12″ sm=”12″ xs=”12″ ]

CUTS AND SCRAPES
[/b3_column]
[b3_column lg=”4″ md=”12″ sm=”12″ xs=”12″ ]

HEAT EXHAUSTION
[/b3_column]
[/b3_row]
Wipes – these should be individually wrapped, moist and easily opened. They are necessary if there is no easy access to hot and cold running water, as sometimes, wounds need to be cleaned.
Adhesive dressings – for all the cuts and minor bleedings, adhesive dressings make the best first aid. These should also be individually wrapped and there should be at least 20 of them in different sizes.
Eye pads – it is best to have 2 sterile eye pads for all the emergencies in which the eyes are hurt and need to be protected from the outside influence.
Bandages – there should be both stretch and regular, triangular bandages in your first aid kit. All of them should be sterile. You need at least two triangular ones and two stretch bandages.
Wound dressings – it goes without saying that the wound dressings should be sterile. They also need to be unmedicated. The best is to two sizes of wound dressings. The smaller one is 12 cm x 12 cm and the larger one is 18 cm x 18 cm. You need 6 small and 2 bigger dressings.
Saline solution and hand sanitisers – these two items are in your first aid kit so that you can make sure the open wounds are not infected. The saline solution can be used to wash the wound and prevent contamination. The hand sanitiser should be used to quickly sanitise the hands of the person administering the first aid. Again, all in the aim of preventing the infections.
Resuscitation mask – this mask is used to help your CPR efforts. It is placed on the patient’s mouth and nose and the air is breathed through the opening. In that way, the contamination is prevented.
Other helpful items – these include gloves, scissors, tweezers and similar items. Their use is to facilitate opening of the packages, removing foreign objects from the wounds, help maintain sterile conditions and the like.
Are Workplace First Aid Kits Required?
Everybody will agree that the first aid kits are needed, but the question remains – are they legally required. The Health and Safety at Work Regulations cover the legal requirements of the workplace first aid. This is where you get the most precise information about the laws covering the first aid kits (facilities) and the first aiders.
The law says that the first aid kits need to be:
In good working order – In other words, you should be able to open, use and close your first aid kit without issues. It should not be compromised in any way, including the environmental conditions like moisture and extreme temperatures.
Clean, safe and accessible – there should be nothing blocking the access to the first aid kit. The worst thing you can do is hide it behind a plant, a piece of furniture and other objects. It needs to be visible and obvious to everyone. Maybe your employees already know where it is, but what if the person who needs to access the first aid kit is simply visiting your premises and doesn’t know them that well. Don’t forget to enable the access for the person’s in wheelchairs, as well.
Suitable for work carried out – again, this is about the contents of your first aid kit, but also about its size and location. The work that is conducted mainly from the cars, should have the vehicle first aid kits. The workplace that has increased levels of risk for the eye injury should have more eye patches in the kits.
Appropriate for the size, location and the number of people in the workplace – each workplace should have at least one first aid kit. If there are more buildings or the building is multi-storey, each storey should have at least one first aid kit. The same goes for the company vehicles. However, the number of kits should be increased if there are more than 50 people in the workplace. Generally, you need one additional first aid kit on every 50 people.
Meeting these legal requirements is absolutely critical in work environments such as schools, for instance. See how you can promote health and safety in schools by providing proper school washroom facilities according to the New Zealand standards.
First aid signs, kits, AEDs, eyewash stations and other first aid tools are items that you don’t really think about until you really need them. However, it may be too late then.
Contact Alsco NZ and, when it comes to first aid, we will do the thinking for you. Our rental system allows you to get first aid kits installed in the best possible places in your workplace. We also restock them and check them regularly for no additional fee. Get your best first aid kits today.